CS184/284A Summer 2025 Homework 2 Write-Up
Link to webpage: https://cs184.snoopboopsnoop.com/hw2
Link to GitHub repository: https://github.com/cal-cs184/hw2-meshedit-jcheng2
Overview
In Homework 2, we built Bezier curves and surfaces using the de Casteljau algorithm and functions that evaluated each step. We then took this a step further by applying the same logic to 3D models and modeled triangle meshes. We then modified these triangle meshes with a half-edge data structure representation and implemented edge flips, splits, and loop subdivision.
Working with the teapot bez and dae models helped me visualize how a 3D complex shape can
be created from scratch using Bezier curves as the layout. Seeing the process of using Phong shading to smoothen out the triangles on
the surface helped me visualize the process that more complex 3D models, such as characters from movies ie. Thanos, go through to achieve the correct texture.
-Crystal
I liked getting behind the curtain and seeing how mesh operations work, I have seen things like subdivision in the context of modeling software like Blender but have never been introduced to the theory, math, or algorithms behind the processes. Plus I also really like the cow model. -Walter
Section I: Bezier Curves and Surfaces
Part 1: Bezier curves with 1D de Casteljau subdivision
I implemented a single step of de Casteljau's algorithm to evaluate Bezier curves using the function BezierCurve::evaluateStep(...).
It computes the next control points based on the points given and the curve parameter t, which allows
us to visualize each Bezier curve evaluation step-by-step when we press E.
de Casteljau's Algorithm
De Casteljau's algorithm is a recursive algorithm used generally for Bezier curves to find points on the curve or split it into smaller curves. It repeatedly performs linear interpolations between consecutive points.
I implemented the evaluateStep function with a for loop running through points using the de Cateljau formula.
- Immediate output: given control points and curve
- Output 1: linear interpolations between the consecutive pairs
- Output 2: linear interpolations between the points from Output 1
- Output 3+: linear interpolations between the points from previous Output
- Final Output: one evaluated point on the curve
std::vector<&Vector2D> BezierCurve::evaluateStep(std::vector<&Vector2D> const &points)
  {
    std::vector<&Vector2D> nextPoints;

    // don't run if less than two points
    if (points.size() < 2) {
      return nextPoints;
    }

    for (size_t i = 0; i < points.size() - 1; ++i) {
      Vector2D interpolated = (1 - t) * points[i] + t * points[i + 1];
      nextPoints.push_back(interpolated);
    }
    return nextPoints;
  }
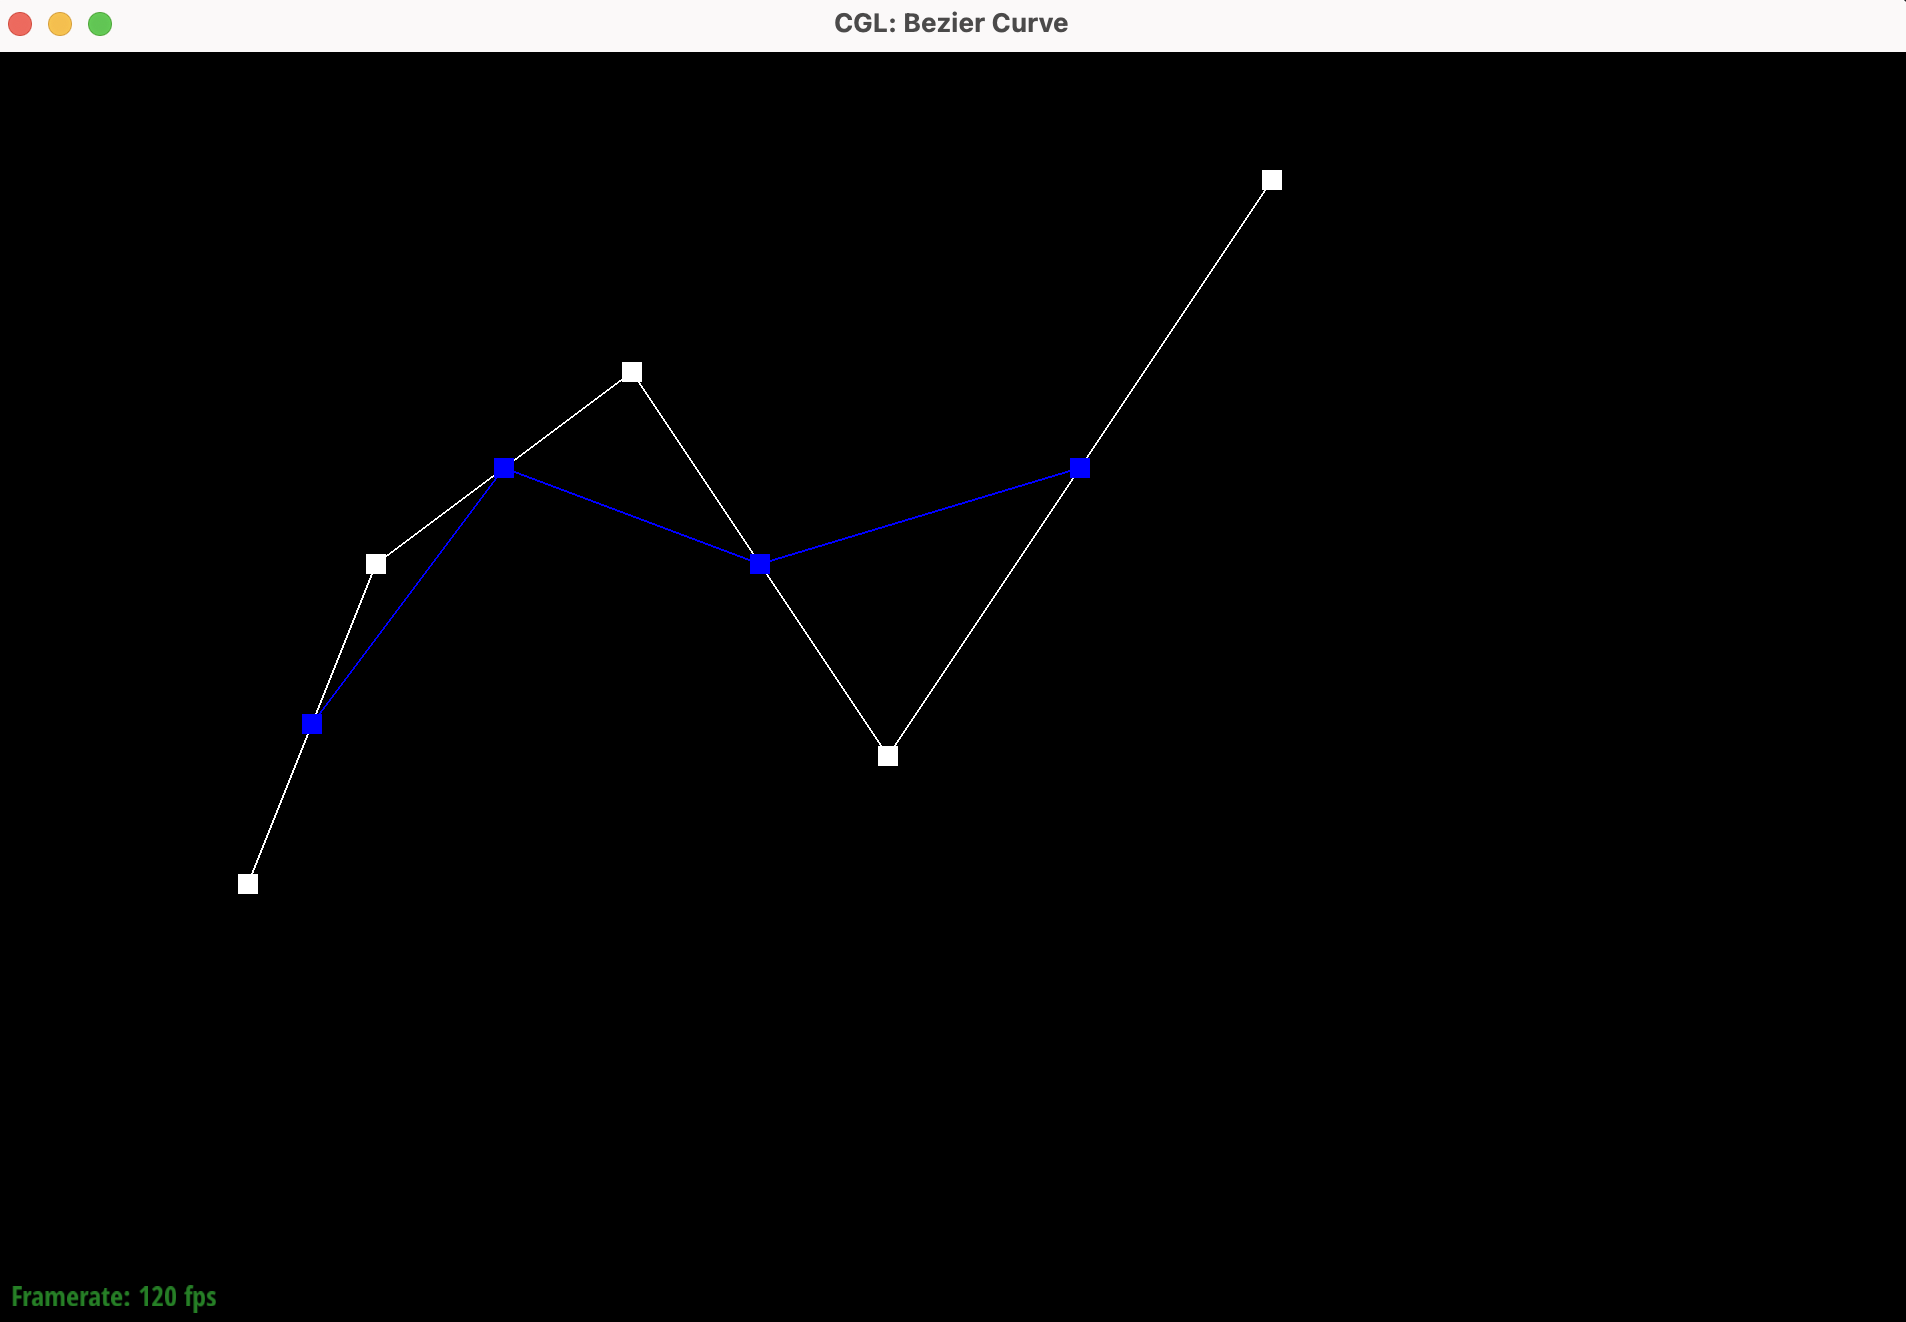
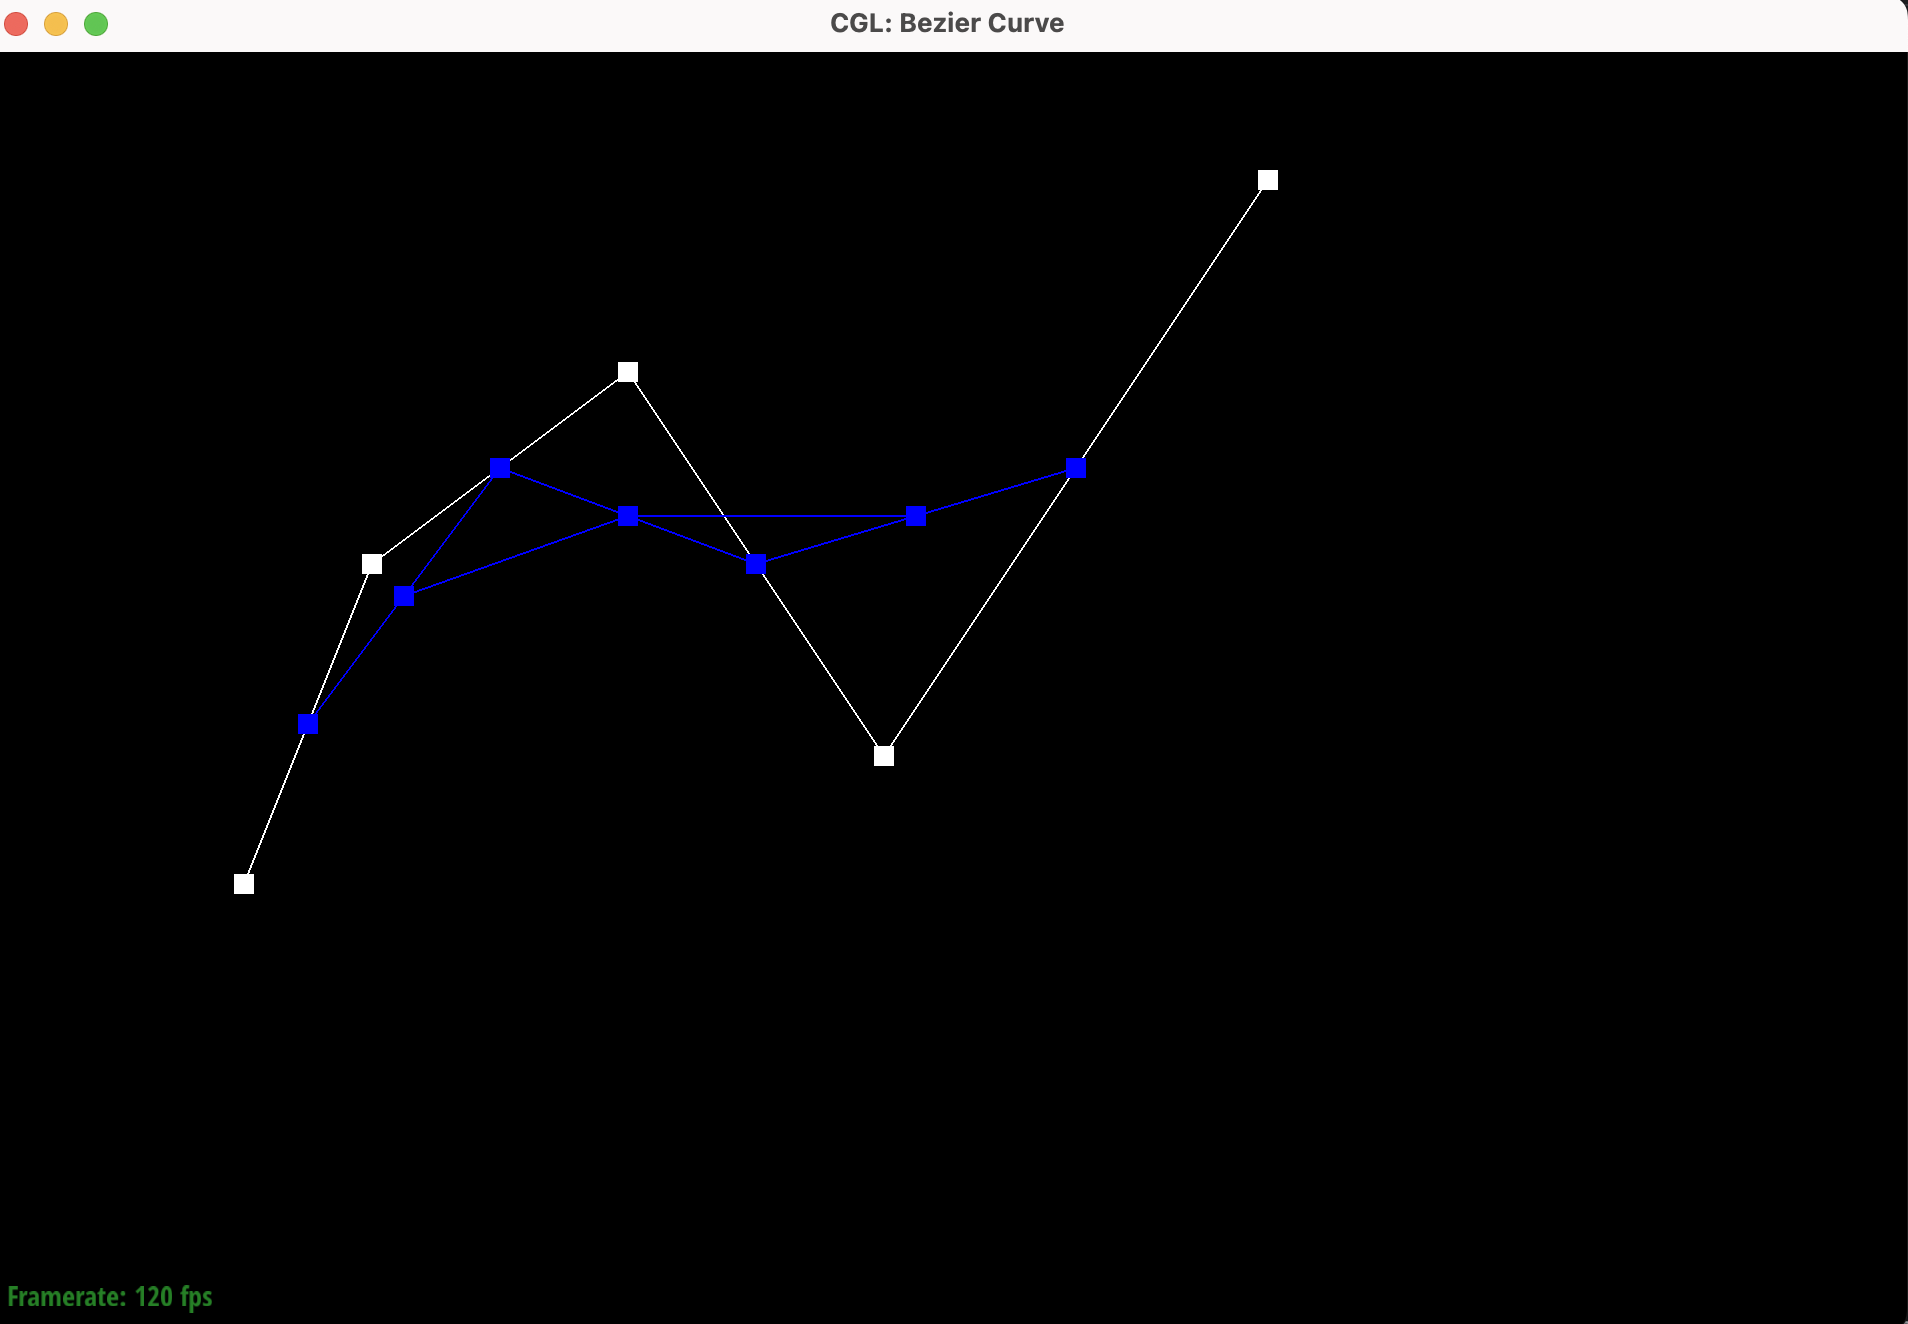
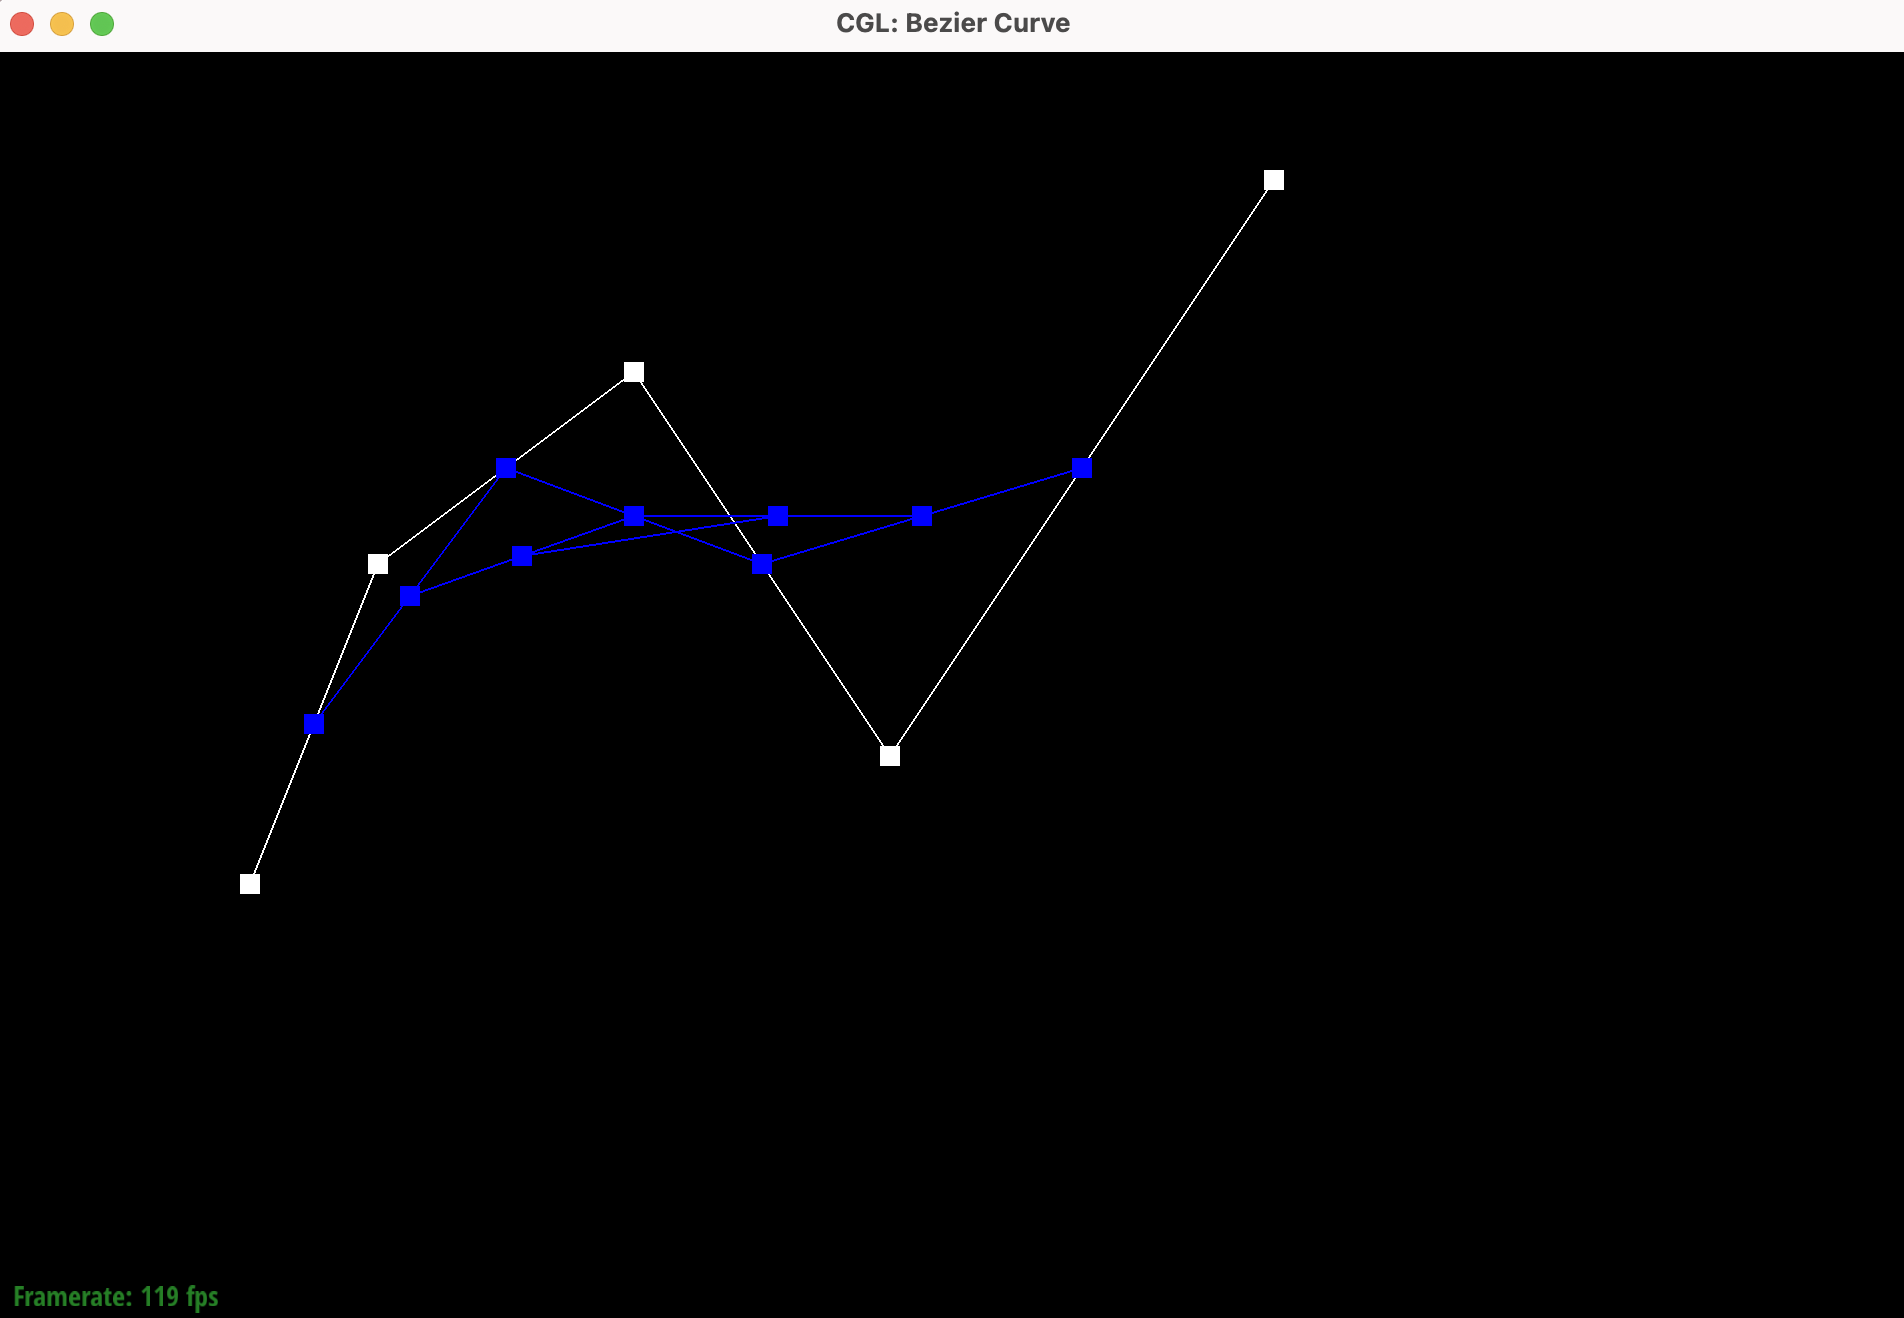
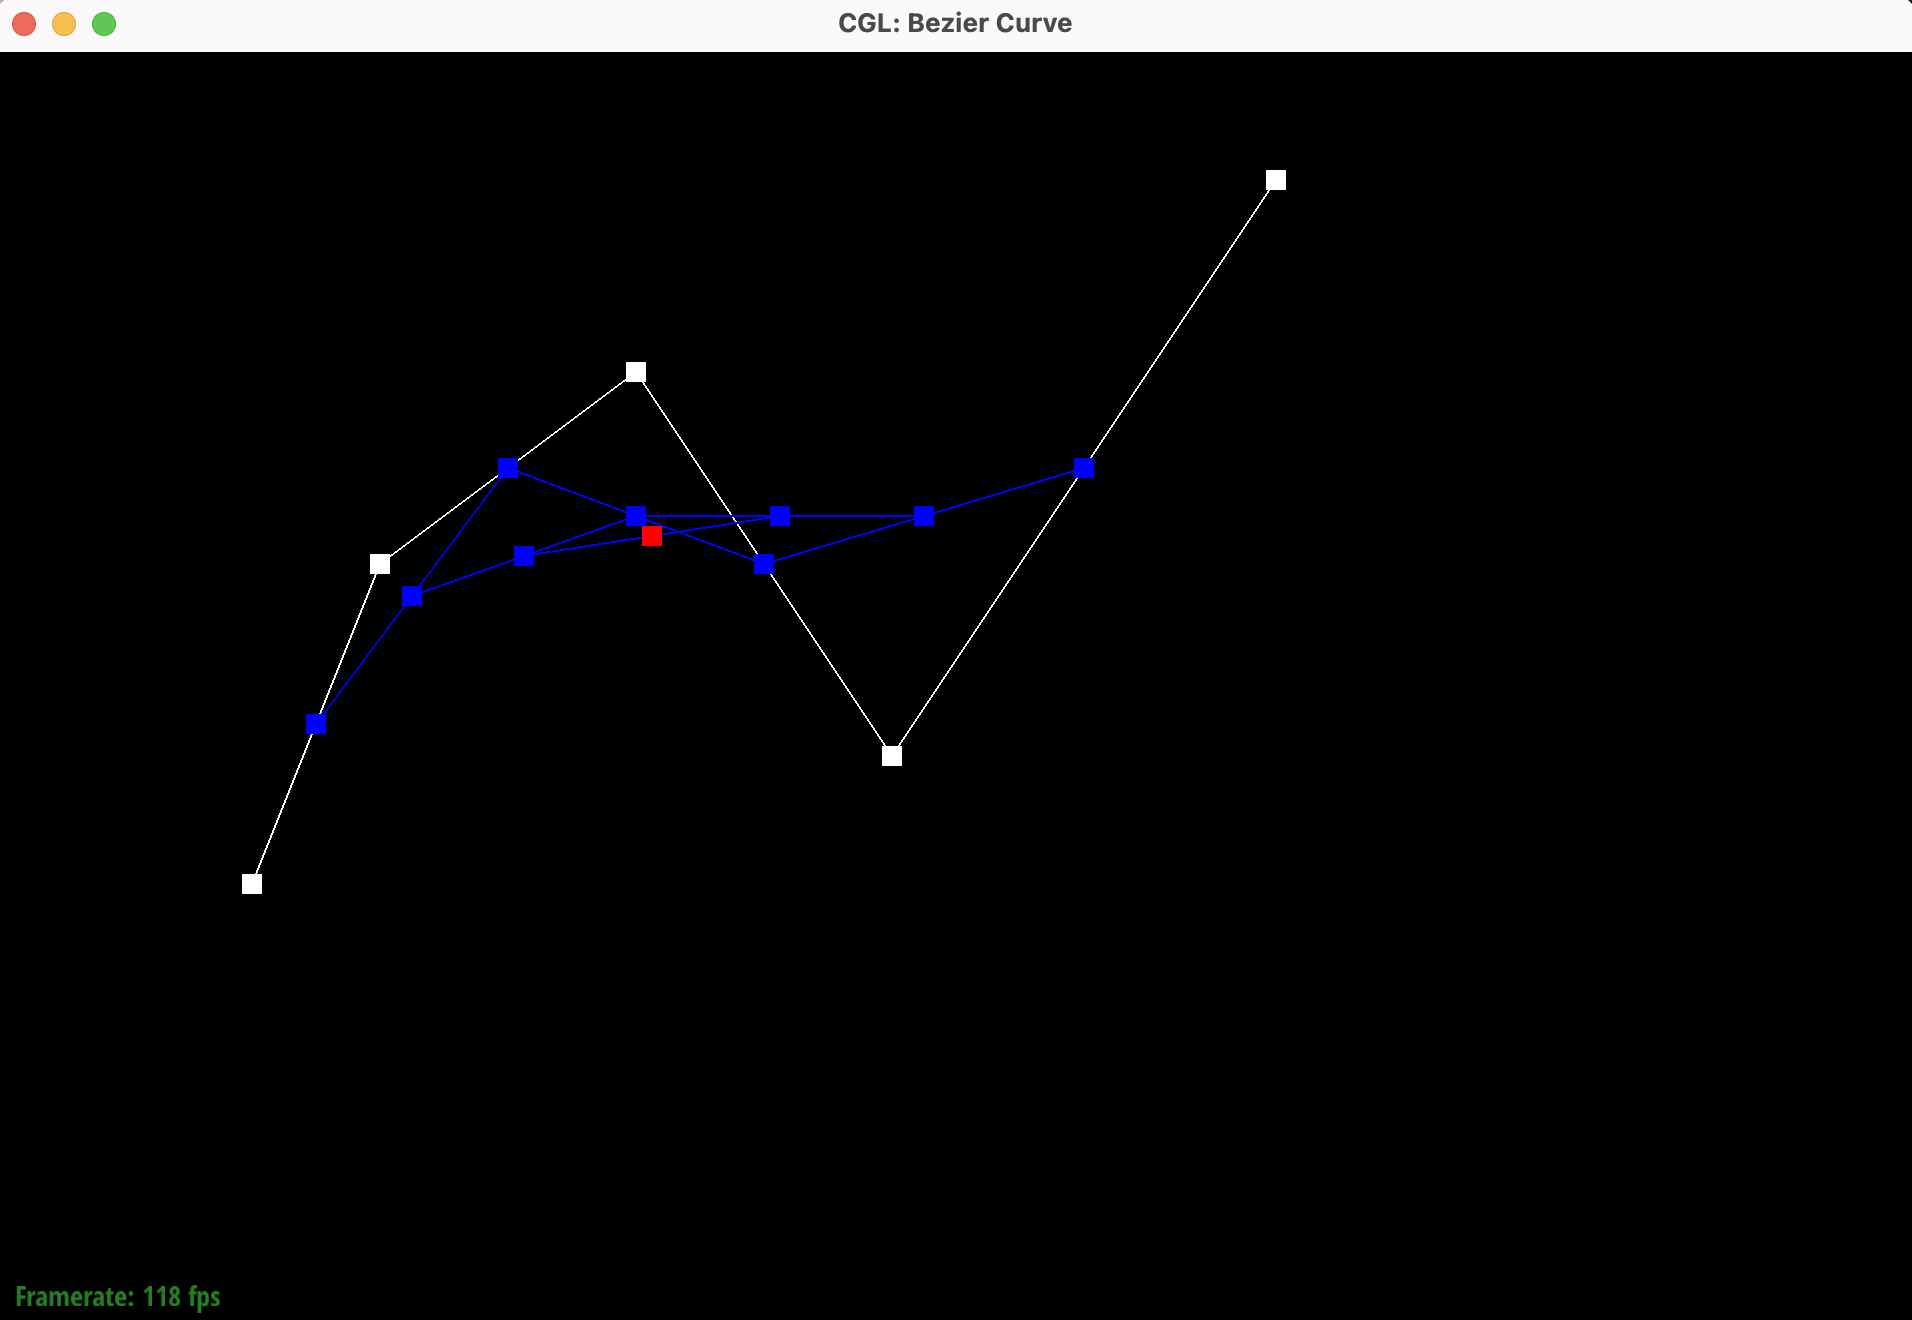
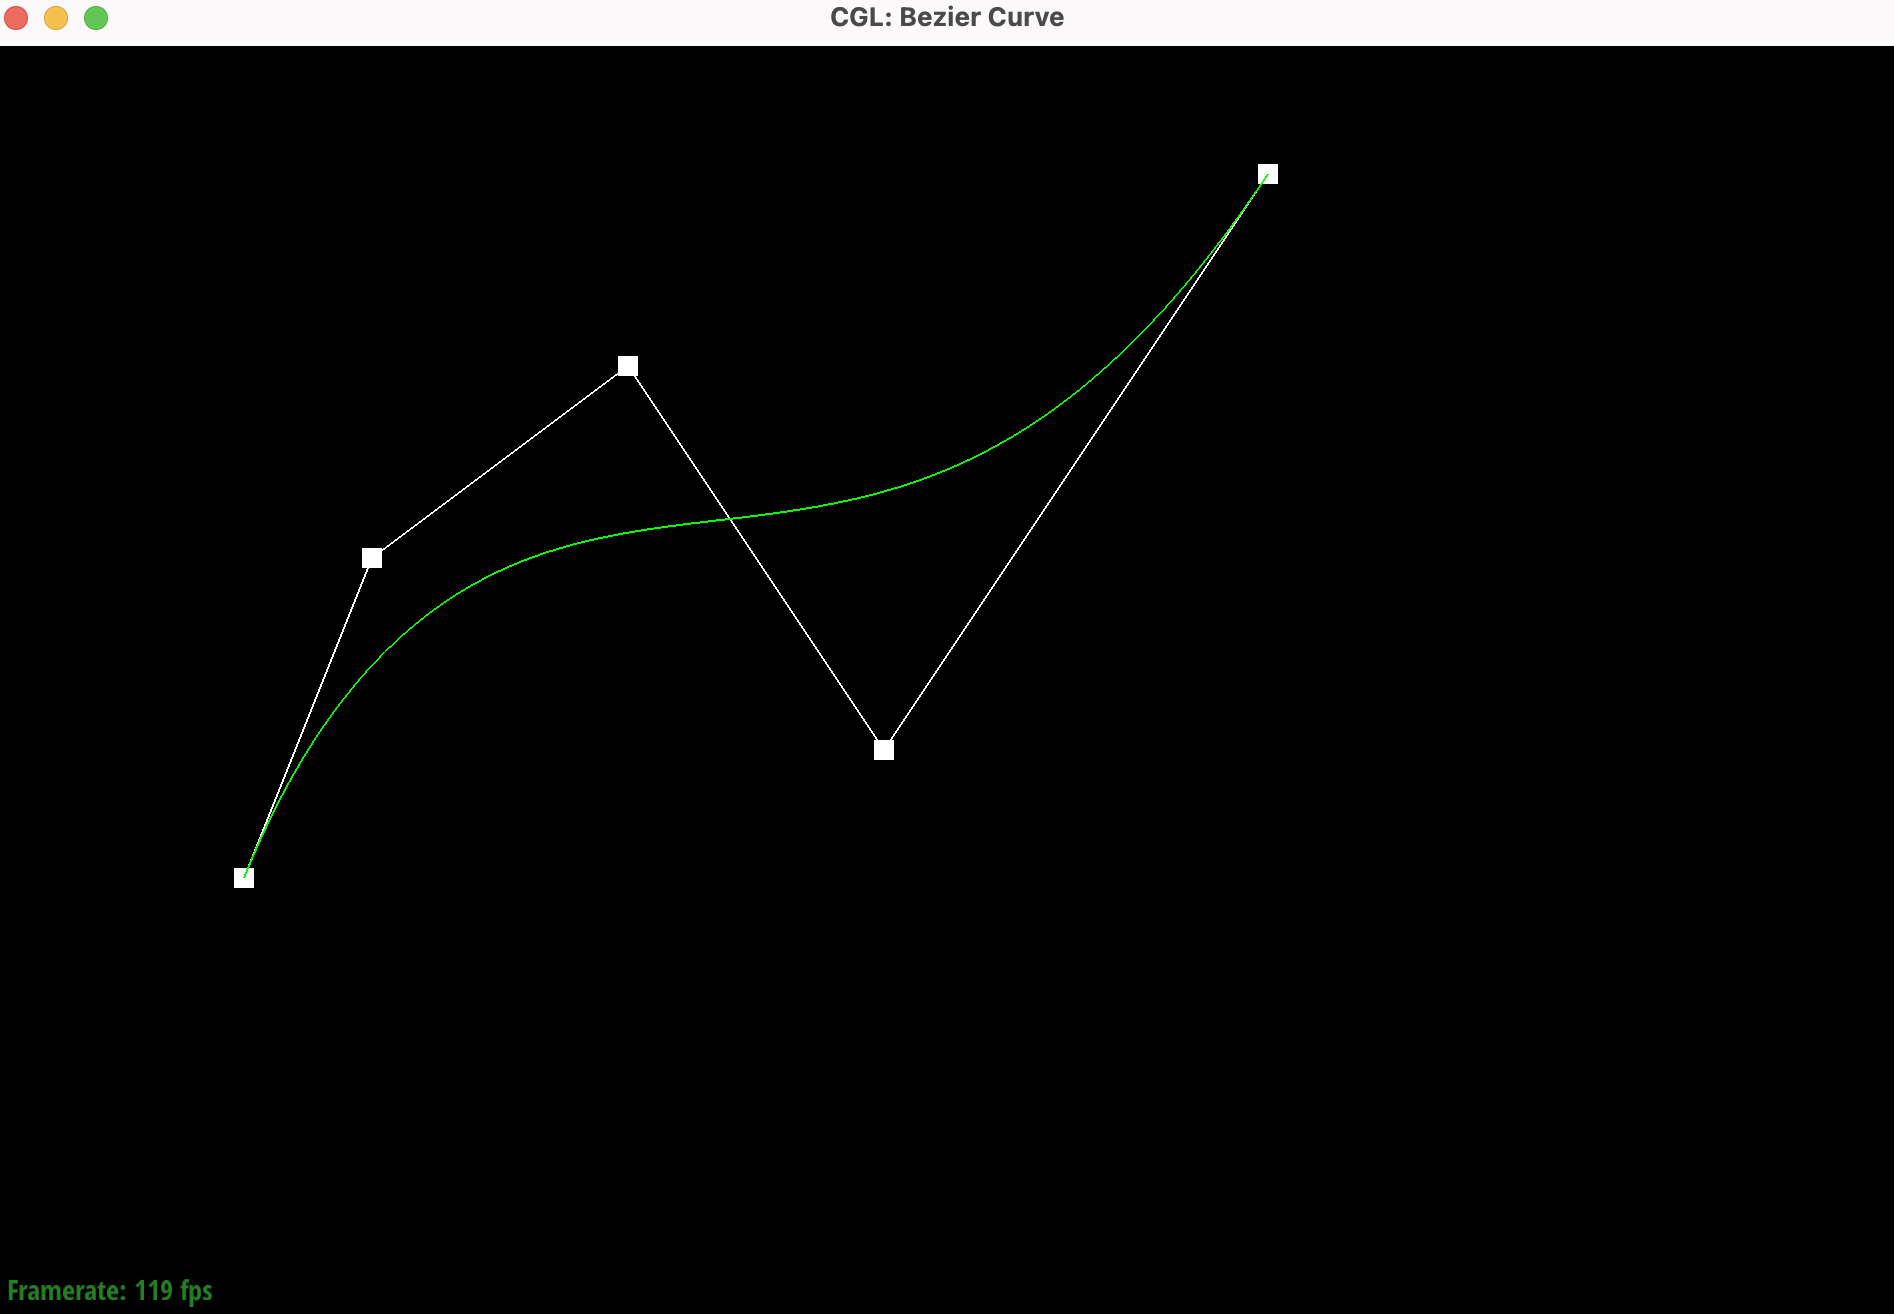
Take a look at the provided .bzc files and create your own Bezier curve with 6 control points of your choosing. Use this Bezier curve for your screenshots below.
5
0.200 0.350
0.300 0.600
0.500 0.750
0.700 0.450
1.000 0.900
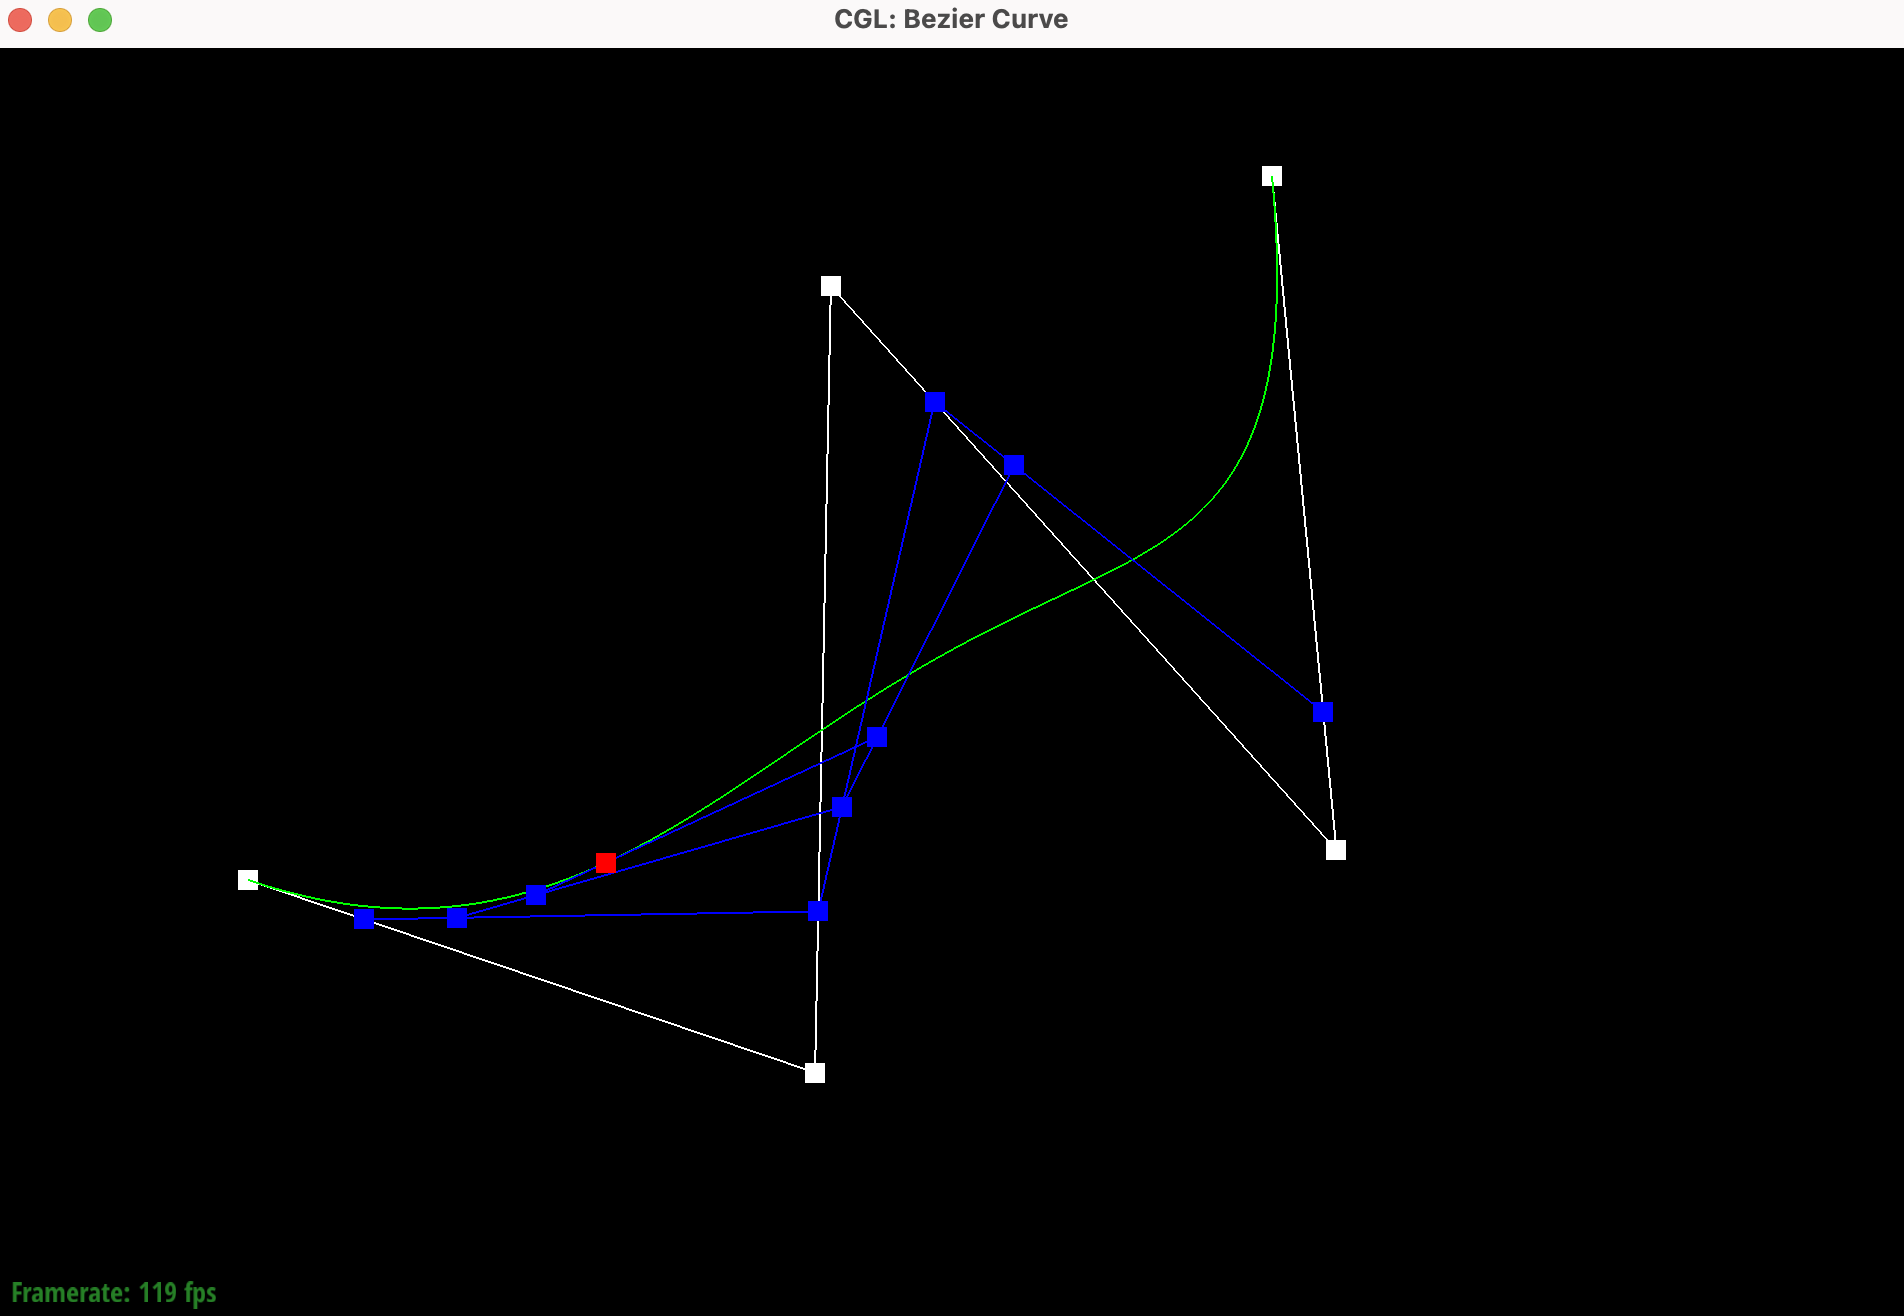
Show screenshots of each step / level of the evaluation from the original control points down to the final evaluated point. Press E to step through. Toggle C to show the completed Bezier curve as well.

newcurve.bzc created |
|
|
|
|
|
Show a screenshot of a slightly different Bezier curve by moving the original control points around and modifying the parameter t via mouse scrolling.
Changing t using the scroll bar changed the position of the evaluated point on the curve, moving all the
linear interpolations in the process.
At first when launching the program I encountered errors whenever pressing E, meaning an issue with having an uninitialized or empty
vector. This led to rendering issues with no points. I added a parameter before running the deCasteljau algorithm
that allowed a check for points of less than 2, which cleared the issue.
Part 2: Bezier Surfaces with Separable 1D de Casteljau
Using the same logic as Part 1, I extended the de Casteljau algorithm from evaluating only 1D Bezier curves to evaluating 2D Bezier surfaces.
This is done by first evaluating curves along the u direction for each row of points,
and then along the v direction across the results from the first evaluation.
The functions BezierPatch::evaluateStep(...),
BezierPatch::evaluate1D(...), and BezierPatch::evaluate(...), work together to make this possible.
de Casteljau Algorithm for Surfaces
Bezier surfaces are made up of 1D Bezier curves in both u and v directions.
So, the de Casteljau algorithm can be extended to surfaces by applying it twice:
first across the rows (1st dimension) and then across the columns (2nd dimension).
The evaluateStep function evaluates just one step of de Casteljau on 3D points
  std::vector BezierPatch::evaluateStep(std::vector const &points, double t) const
  {
    std::vector nextPoints;

    // we need at least 2 points to interpolate
    if (points.size() < 2) {
      return nextPoints;
    }

    // interpolate between every pair of adjacent points
    for (size_t i = 0; i < points.size() - 1; ++i) {
      Vector3D interpolated = (1 - t) * points[i] + t * points[i + 1];
      nextPoints.push_back(interpolated);
    }

    return nextPoints;
  }
The evaluate1D function recursively evaluates a 1D Bezier curve to a single point.
  Vector3D BezierPatch::evaluate1D(std::vector const &points, double t) const
  {
    std::vector currPoints = points;

    // call recursively until only 1 point left
    while (currPoints.size() > 1) {
      currPoints = evaluateStep(currPoints, t);
    }

    // if empty, return default 3D vector
    if (currPoints.empty()) {
      return Vector3D(0, 0, 0);
    }

    return currPoints[0];
  }
The evaluate function evaluates the full Bezier surface at (u, v)
  Vector3D BezierPatch::evaluate(double u, double v) const
  {
    std::vector evaluatedPoints;

    // evaluate each row at u
    for (const std::vector& row : controlPoints) {
      // result is one point on that row's curve
      Vector3D pointOnRowCurve = evaluate1D(row, u);
      evaluatedPoints.push_back(pointOnRowCurve);
    }

    // evaluate vertical curve at v
    Vector3D surfacePoint = evaluate1D(evaluatedPoints, v);
    return surfacePoint;
  }
Show a screenshot of bez/teapot.bez (not .dae) evaluated by your implementation.
bez/teapot.bez rendered using my implementation of separable 1D de Casteljau
In the screenshot of teapot.bez above, the 3D Bezier surface is loaded in correctly because of the 3 functions implemented
for recursive evaluation across the u and v directions.
At first, I was receiving the error message "Error converting polygons to halfedge mesh: number of vertex positions is different from the number of distinct vertices!
(number of positions in input: 32)
(number of vertices in mesh: 0)".
But After adding safety measures such as the
if (points.size() < 2) return nextPoints;
in the
std::vector function, I was able to run the code properly without segmentation faults.
Using the 3 functions, we have successfully used curve evaluations to represent complex surfaces as well.
Section II: Triangle Meshes and Half-Edge Data Structure
Part 3: Area-weighted vertex normals
Part 3 focuses on adding area-weighted normal vectors at vertices of the half-edge data structure. function Vertex::normal() iterates over all faces adjacent to a vertex, computes each face’s normal and area,
sums the area-weighted normals, and then normalizes the result, producing the vertex normal.
Implementation Details of Area-Weighted Vertex Normals
The function Vertex::normal() approximates the unit normal at a vertex with area-weighted vertex normals.
We weight each face normal by its area to make the rendered result more accurate.
Starting from a half-edge at the vertex, we compute the face normal of the current triangle using the cross product
and add this to normalSum. We move to the next triangle around the vertex using twin() to get to the twin edge and then the next edge.
We loop until we end up at the starting half-edge again. To make it a unit normal, we normalize the final vector and return.
Vector3D Vertex::normal( void ) const
  {
	// start with half-edge at vertex
    Vector3D normalSum(0, 0, 0);
    HalfedgeCIter start = halfedge();
    HalfedgeCIter curr = start;

    do {
      Vector3D p0 = curr->vertex()->position;
      Vector3D p1 = curr->next()->vertex()->position;
      Vector3D p2 = curr->next()->next()->vertex()->position;

		// take area-weighted avg of the normals of neighboring triangles
      Vector3D faceNormal = cross(p1 - p0, p2 - p0);
      normalSum += faceNormal;

      curr = curr->twin()->next();
    } while (curr != start);

	// normalize entire sum of normals
    normalSum.normalize();

    return normalSum;
  }
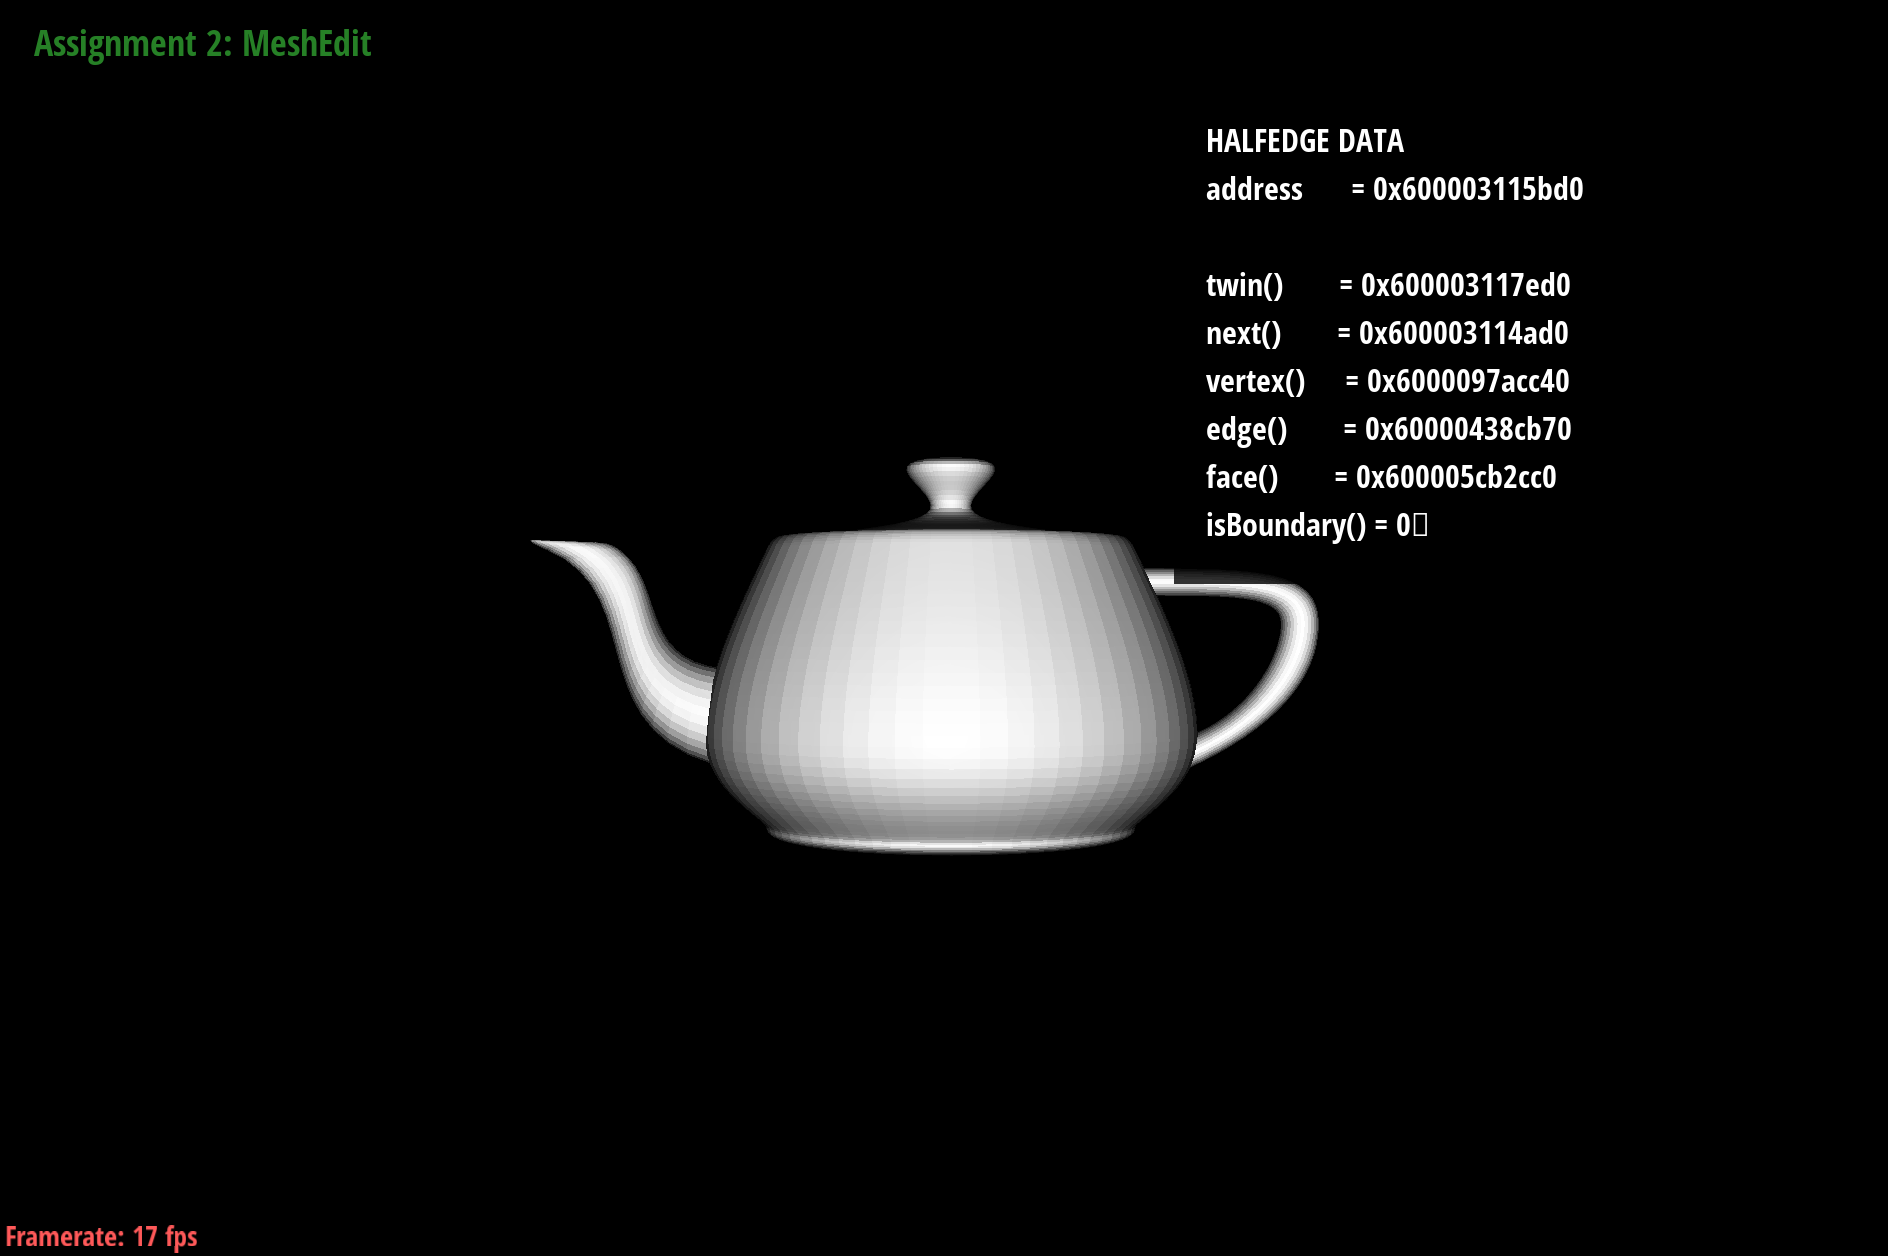
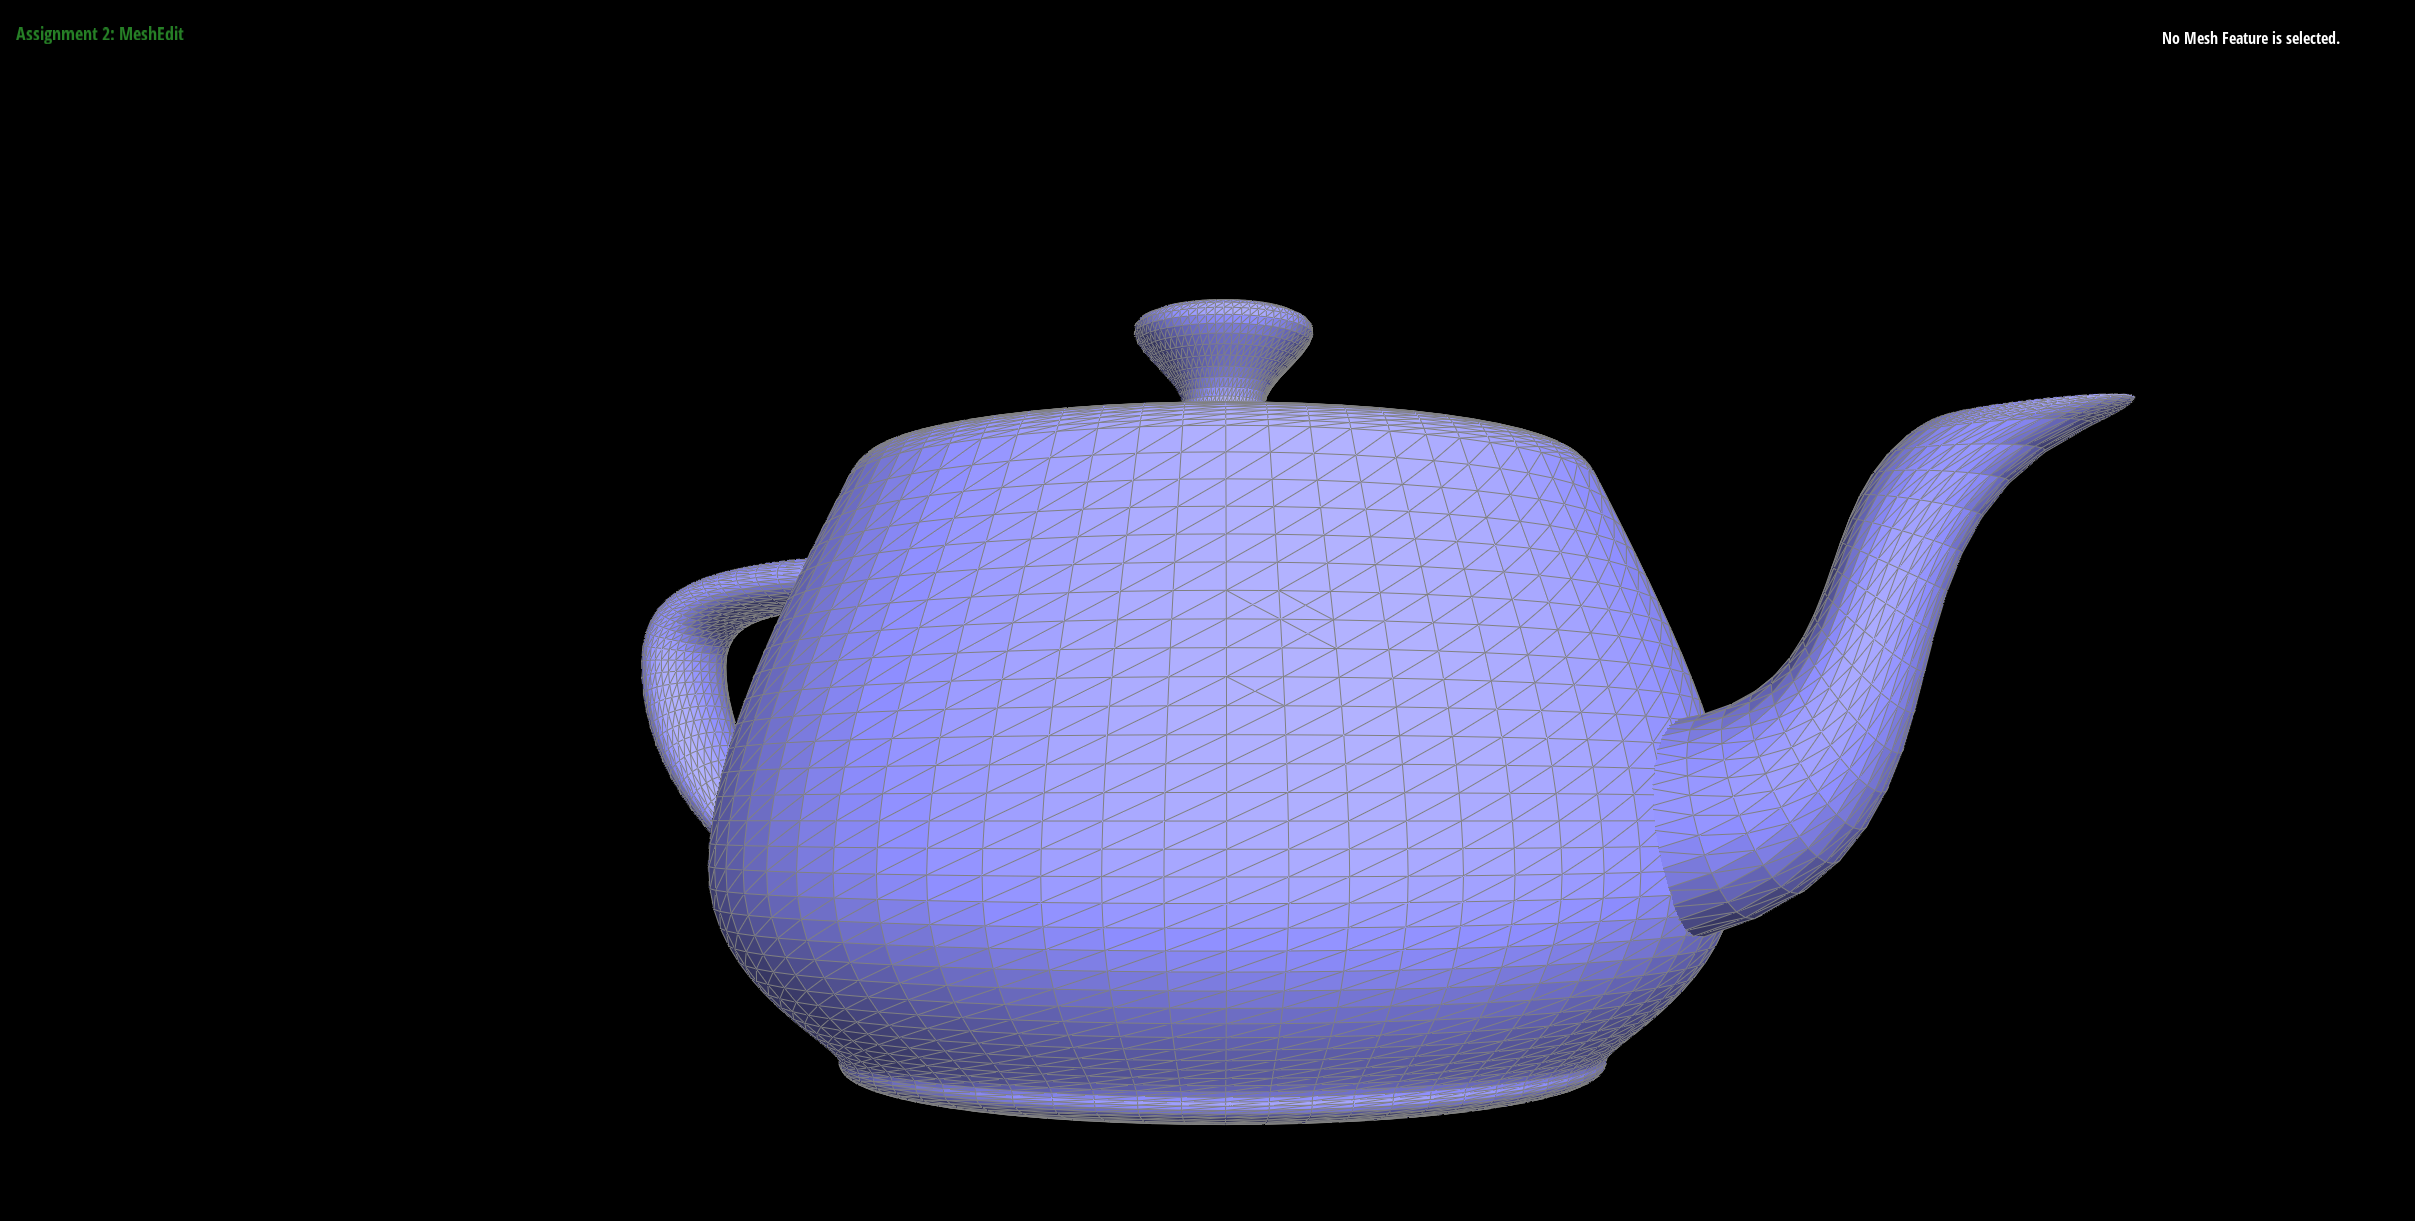
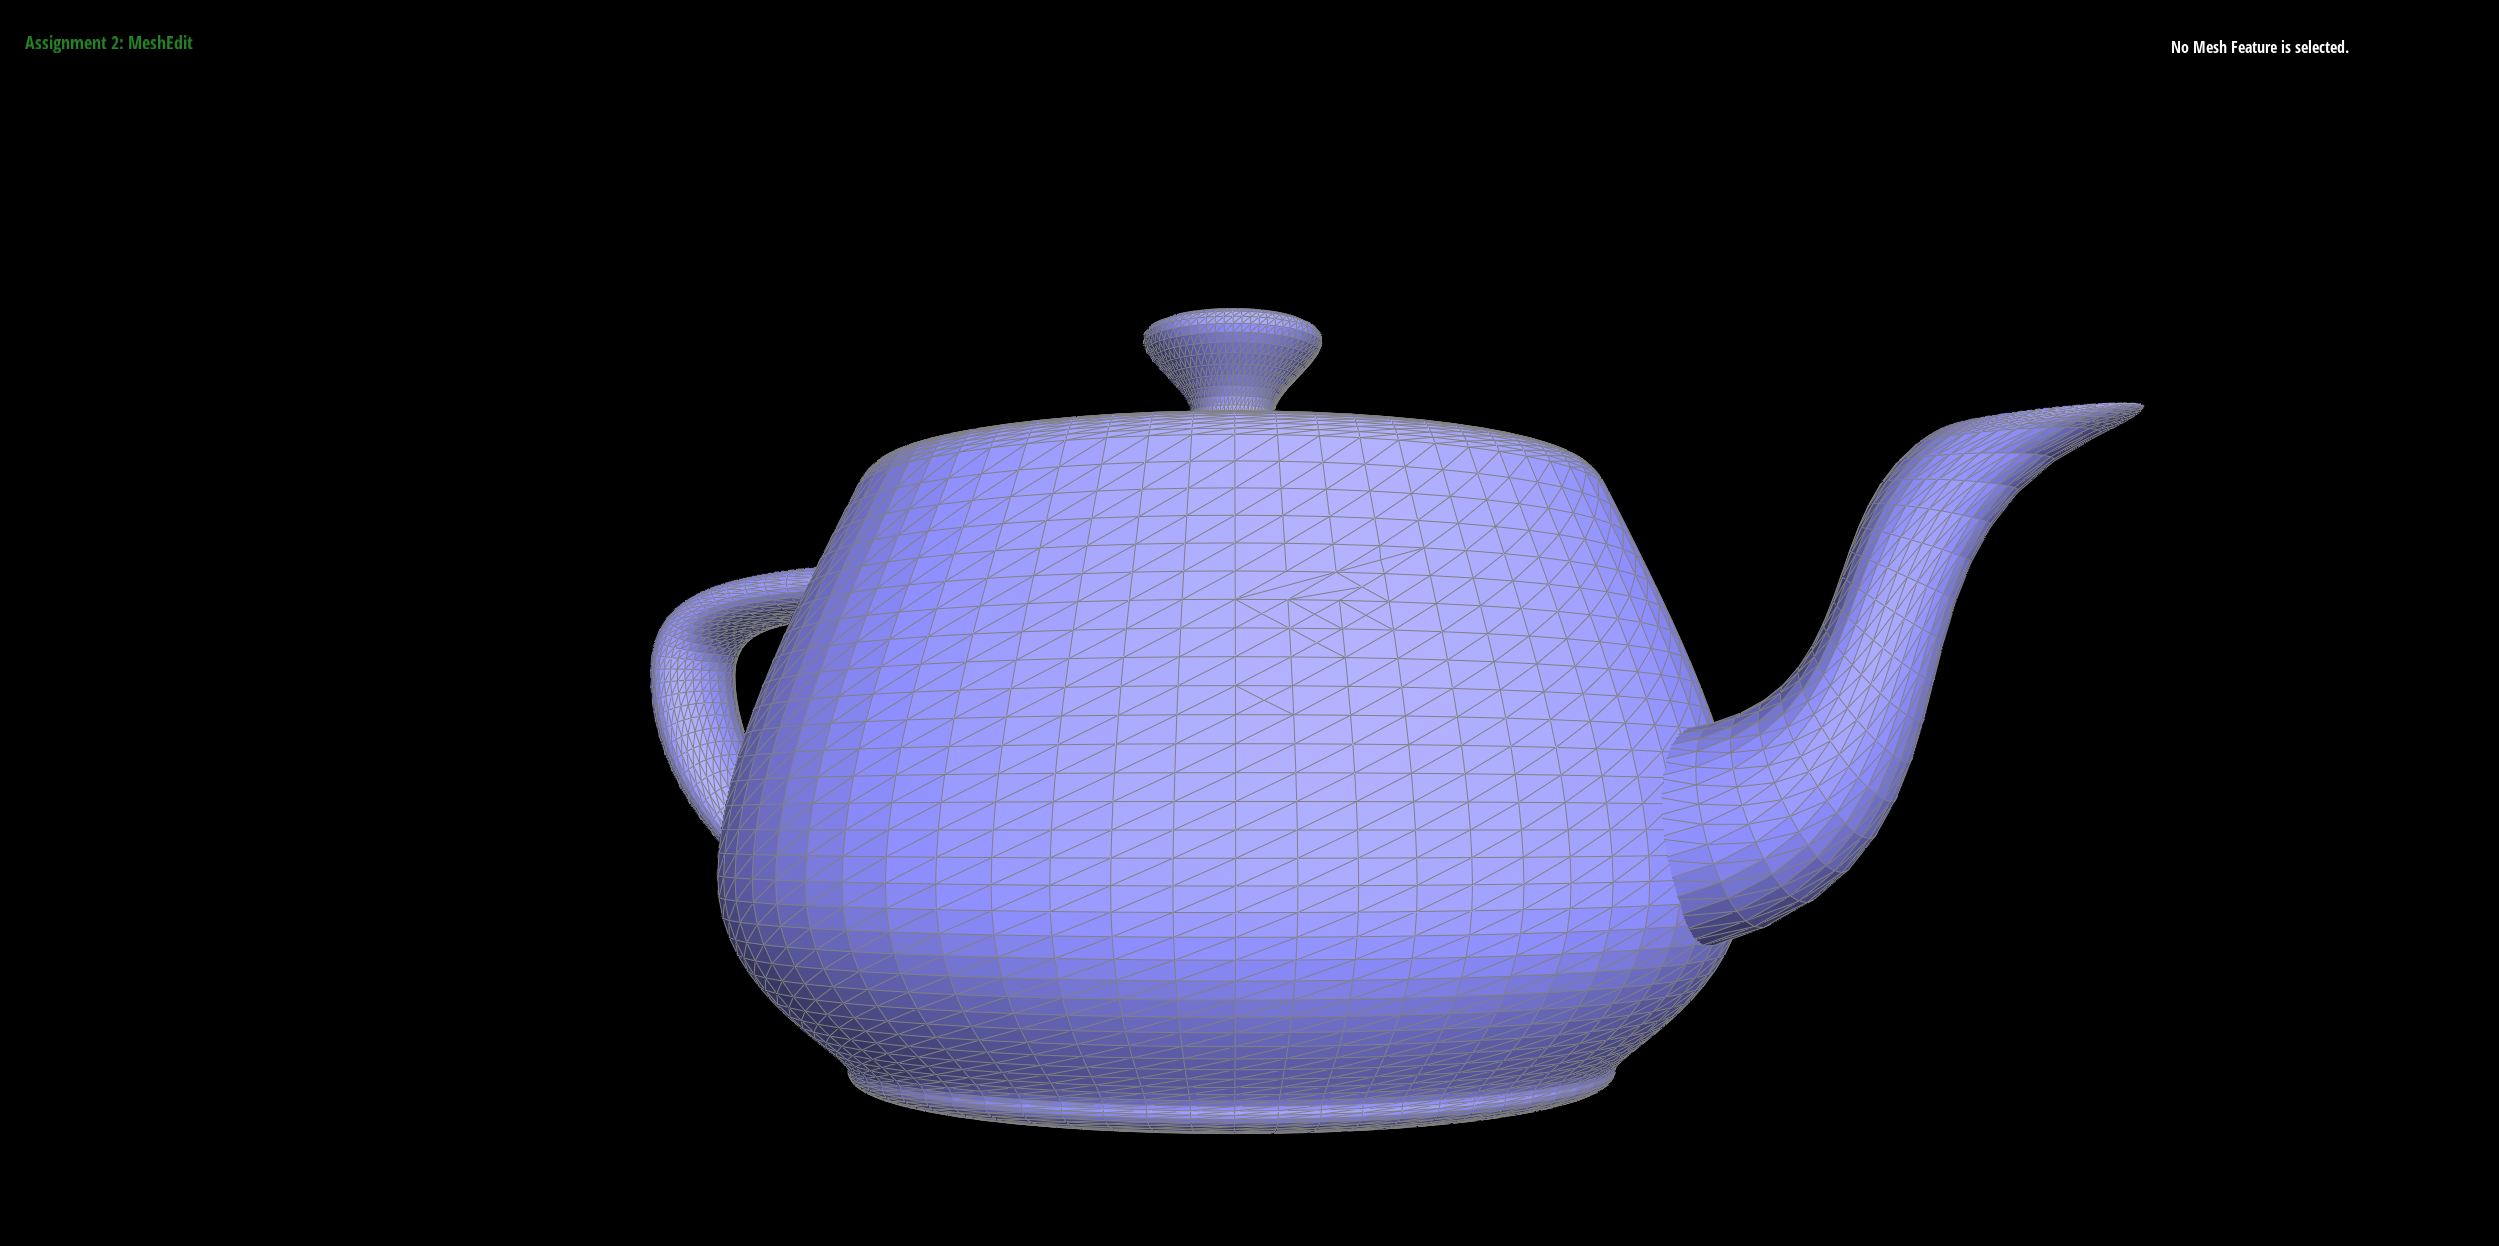
Show screenshots of dae/teapot.dae comparing flat shading with smooth shading using your vertex normals.
Use the Q key to toggle shading modes in meshedit.

dae/teapot.dae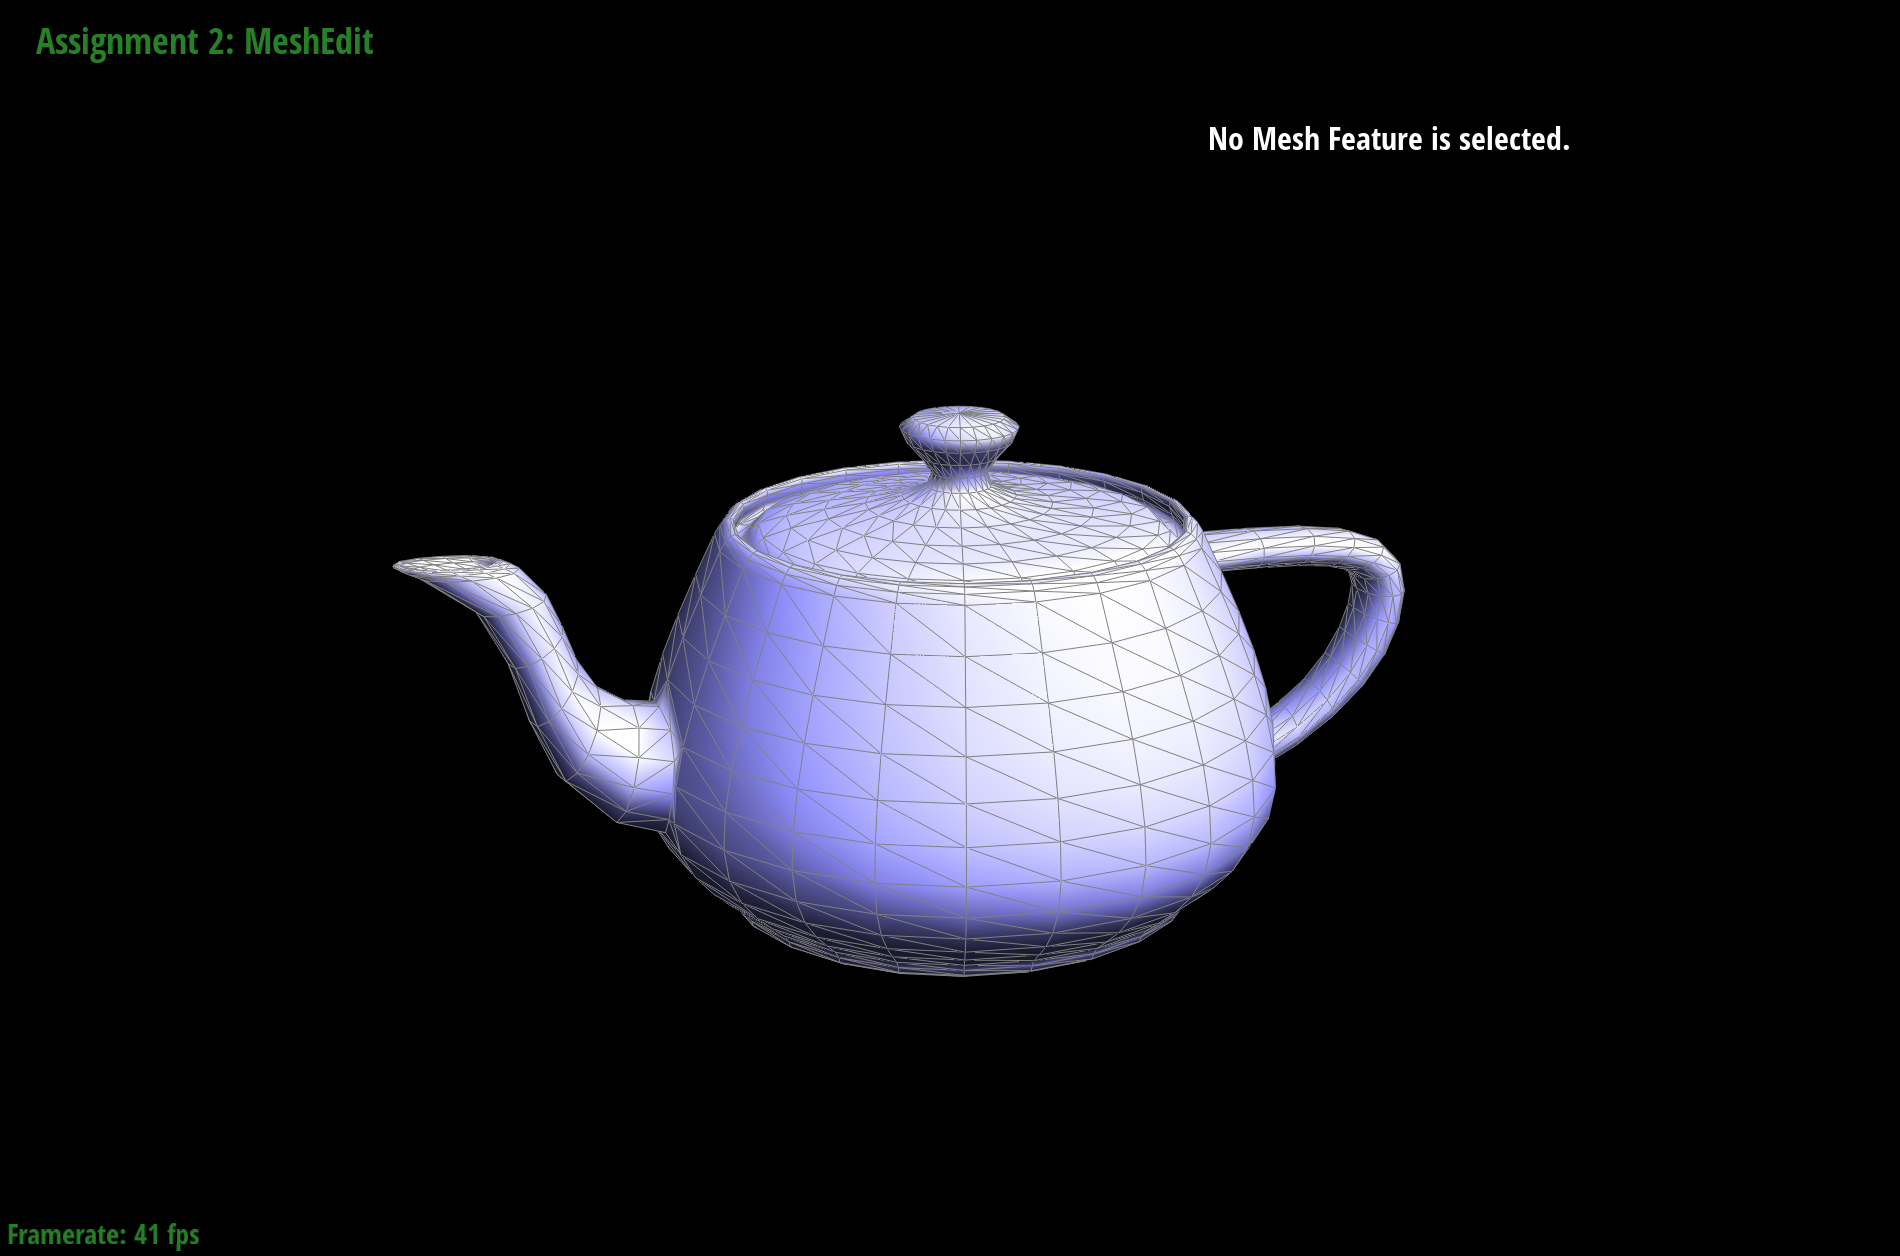
Looking at the screenshots above, toggling area-weighted vertex normals smoothens the triangle boundaries by interpolating across faces and creating a more realistic surface. Without vertex normals, triangles show up with harsh shading and boundaries.
At first I tried running the while loop with just one variable curr to track the current HalfedgeCIter initialized to
the starting halfedgeCIter, but found that another variable start was needed to ensure the loop ended when we reached the original
vertex.
Part 4: Edge flip
In Part 4, we implemented a new edge flip function that operates on an edge. This local remeshing operation converts the original pair of triangles (a,b,c) and (c,b,d) into a new pair (a,d,c) and (a,b,d). This flips happens over their shared edge (b, c).
Edge Flip Operation
We implemented the edge flip operation by flipping the shared edge on two adjacent triangles, which remeshes the figure. The function checks that the adjacent faces we are looking at are not boundaries, or else exits. It then re-assigns half-edge, vertex, edge, and face pointers to reflect the new connectivity.
We made sure to never flip a boundary edge, or add/delete any mesh elements. Pointers were re-assigned instead of creating new mesh elements to maintain the same number of elements before and after the edge flip.
      if (e0->halfedge()->face()->isBoundary() ||
          e0->halfedge()->twin()->isBoundary()) {
          return e0;
      }

      HalfedgeIter BC = e0->halfedge();
      HalfedgeIter CA = BC->next();
      HalfedgeIter AB = CA->next();

      HalfedgeIter CB = BC->twin();
      HalfedgeIter BD = CB->next();
      HalfedgeIter DC = BD->next();

      VertexIter A = AB->vertex();
      VertexIter B = BC->vertex();
      VertexIter C = CA->vertex();
      VertexIter D = DC->vertex();

      FaceIter ABC = BC->face();
      FaceIter CBD = CB->face();

      BC->vertex() = A;
      CB->vertex() = D;

      HalfedgeIter AD = BC;
      HalfedgeIter DA = CB;

      FaceIter ADC = ABC;
      FaceIter DAB = CBD;

      AD->next() = DC;
      DC->next() = CA;
      CA->next() = AD;

      DA->next() = AB;
      AB->next() = BD;
      BD->next() = DA;

      DC->face() = ADC;
      AB->face() = DAB;

      ADC->halfedge() = AD;
      DAB->halfedge() = DA;

      A->halfedge() = AD;
      B->halfedge() = BD;
      C->halfedge() = CA;
      D->halfedge() = DA;
Show screenshots of the teapot before and after some edge flips.


Part 5: Edge split
In Part 5, we implemented an edge split function that inserts a new vertex at the midpoint of a pair of triangles (a, b, c) and (c, b, d). They are split along their shared edge (b, c) and the new vertex connects to each opposing vertex a and d. The result is 4 smaller triangles.
Edge Split Operation
We implemented the edge split operation by adding a vertex at the midpoint of an edge, using that point to create 4 smaller triangles that replace the original 2 triangles there.
For implementation, I didn't run into any particular debugging problems. I kept track of all edges and vertices, making sure to never create new ones. Instead, I only re-assigned these variables to avoid any errors typically caused by mistakenly creating new edges and vertices. The edges and vertices in the mesh were defined the same way as in part 4, so I will skip that part below.
Show screenshots of a mesh before and after some edge splits.
Show screenshots of a mesh before and after a combination of both edge splits and edge flips.
Part 6: Loop subdivision for mesh upsampling
Loop subdivision allows for the smoothing of meshes by subdividing each triangle within a mesh and moving around vertices to get a more uniform result.
We followed the code outline given in the comments in MeshResampler::upsample().
1. Compute Updated Old Vertex Positions
Using the formula given in the spec, we calculate updated old vertex positions, and save them temporarily in v->newPosition.
for (VertexIter v = mesh.verticesBegin(); v != mesh.verticesEnd(); ++v) {
    v->isNew = false;

    int deg = v->degree();

    float u;
    if (deg == 3) {
        u = 3.0f / 16.0f;
    }
    else {
        u = 3.0f / (8.0f * deg);
    }

    Vector3D sum;

    // iterate thru all the neighborign vertices (from discussion!)
    HalfedgeIter curr = v->halfedge();
    HalfedgeIter end = curr;
    do {
        sum += curr->next()->vertex()->position;
        curr = curr->next()->next()->twin();
    } while (curr != end);

    v->newPosition = (1 - deg * u) * v->position + u * sum;
}
2. Compute New Vertex Positions
Using the other formula given in the spec, we compute the new vertex positions, and save them temporarily in e->newPosition,
since the vertex will soon be created on that edge
for (EdgeIter e : oldEdges) {
    e->isNew = false;

    HalfedgeIter AB = e->halfedge();
    HalfedgeIter BA = AB->twin();
    Vector3D newPos = (3.0f / 8.0f) * (AB->vertex()->position + BA->vertex()->position);
    newPos += (1.0f / 8.0f) * (AB->next()->next()->vertex()->position + BA->next()->next()->vertex()->position);

    e->newPosition = newPos;
}
3 & 4. Split All Edges, Flip Some Edges
We'll go through and split all old edges, then go through again and check if any edge connects an old vertex to a new vertex, in which case we will flip it. note that we also assign the new vertex positions calculated in step 2.
// 3.
for (EdgeIter e : oldEdges) {
    VertexIter v = mesh.splitEdge(e);
    v->isNew = true;
    v->newPosition = e->newPosition;
}

// 4.
for (EdgeIter e = mesh.edgesBegin(); e != mesh.edgesEnd(); ++e) {
    if (e->isNew) {
        if (e->halfedge()->vertex()->isNew != e->halfedge()->twin()->vertex()->isNew) {
            mesh.flipEdge(e);
        }
    }
}
5. Update Old Vertex Positions
To top it off, simply take the stored new vertex positions and assign them.
for (VertexIter v = mesh.verticesBegin(); v != mesh.verticesEnd(); ++v) {
    v->position = v->newPosition;
}
Take some notes, as well as some screenshots, of your observations on how meshes behave after loop subdivision. What happens to sharp corners and edges? Can you reduce this effect by pre-splitting some edges?

We see very noticeable smoothing after 2 iterations of subdivision, since there are many more triangles in the mesh. Noticeably, the sharp parts of the image get smoothed out over time. A solution for this that is generally practiced is marking boundary lines that will not be subdivided over time, maintaining a better shape.
We can see this a bit more clearly with a cube:
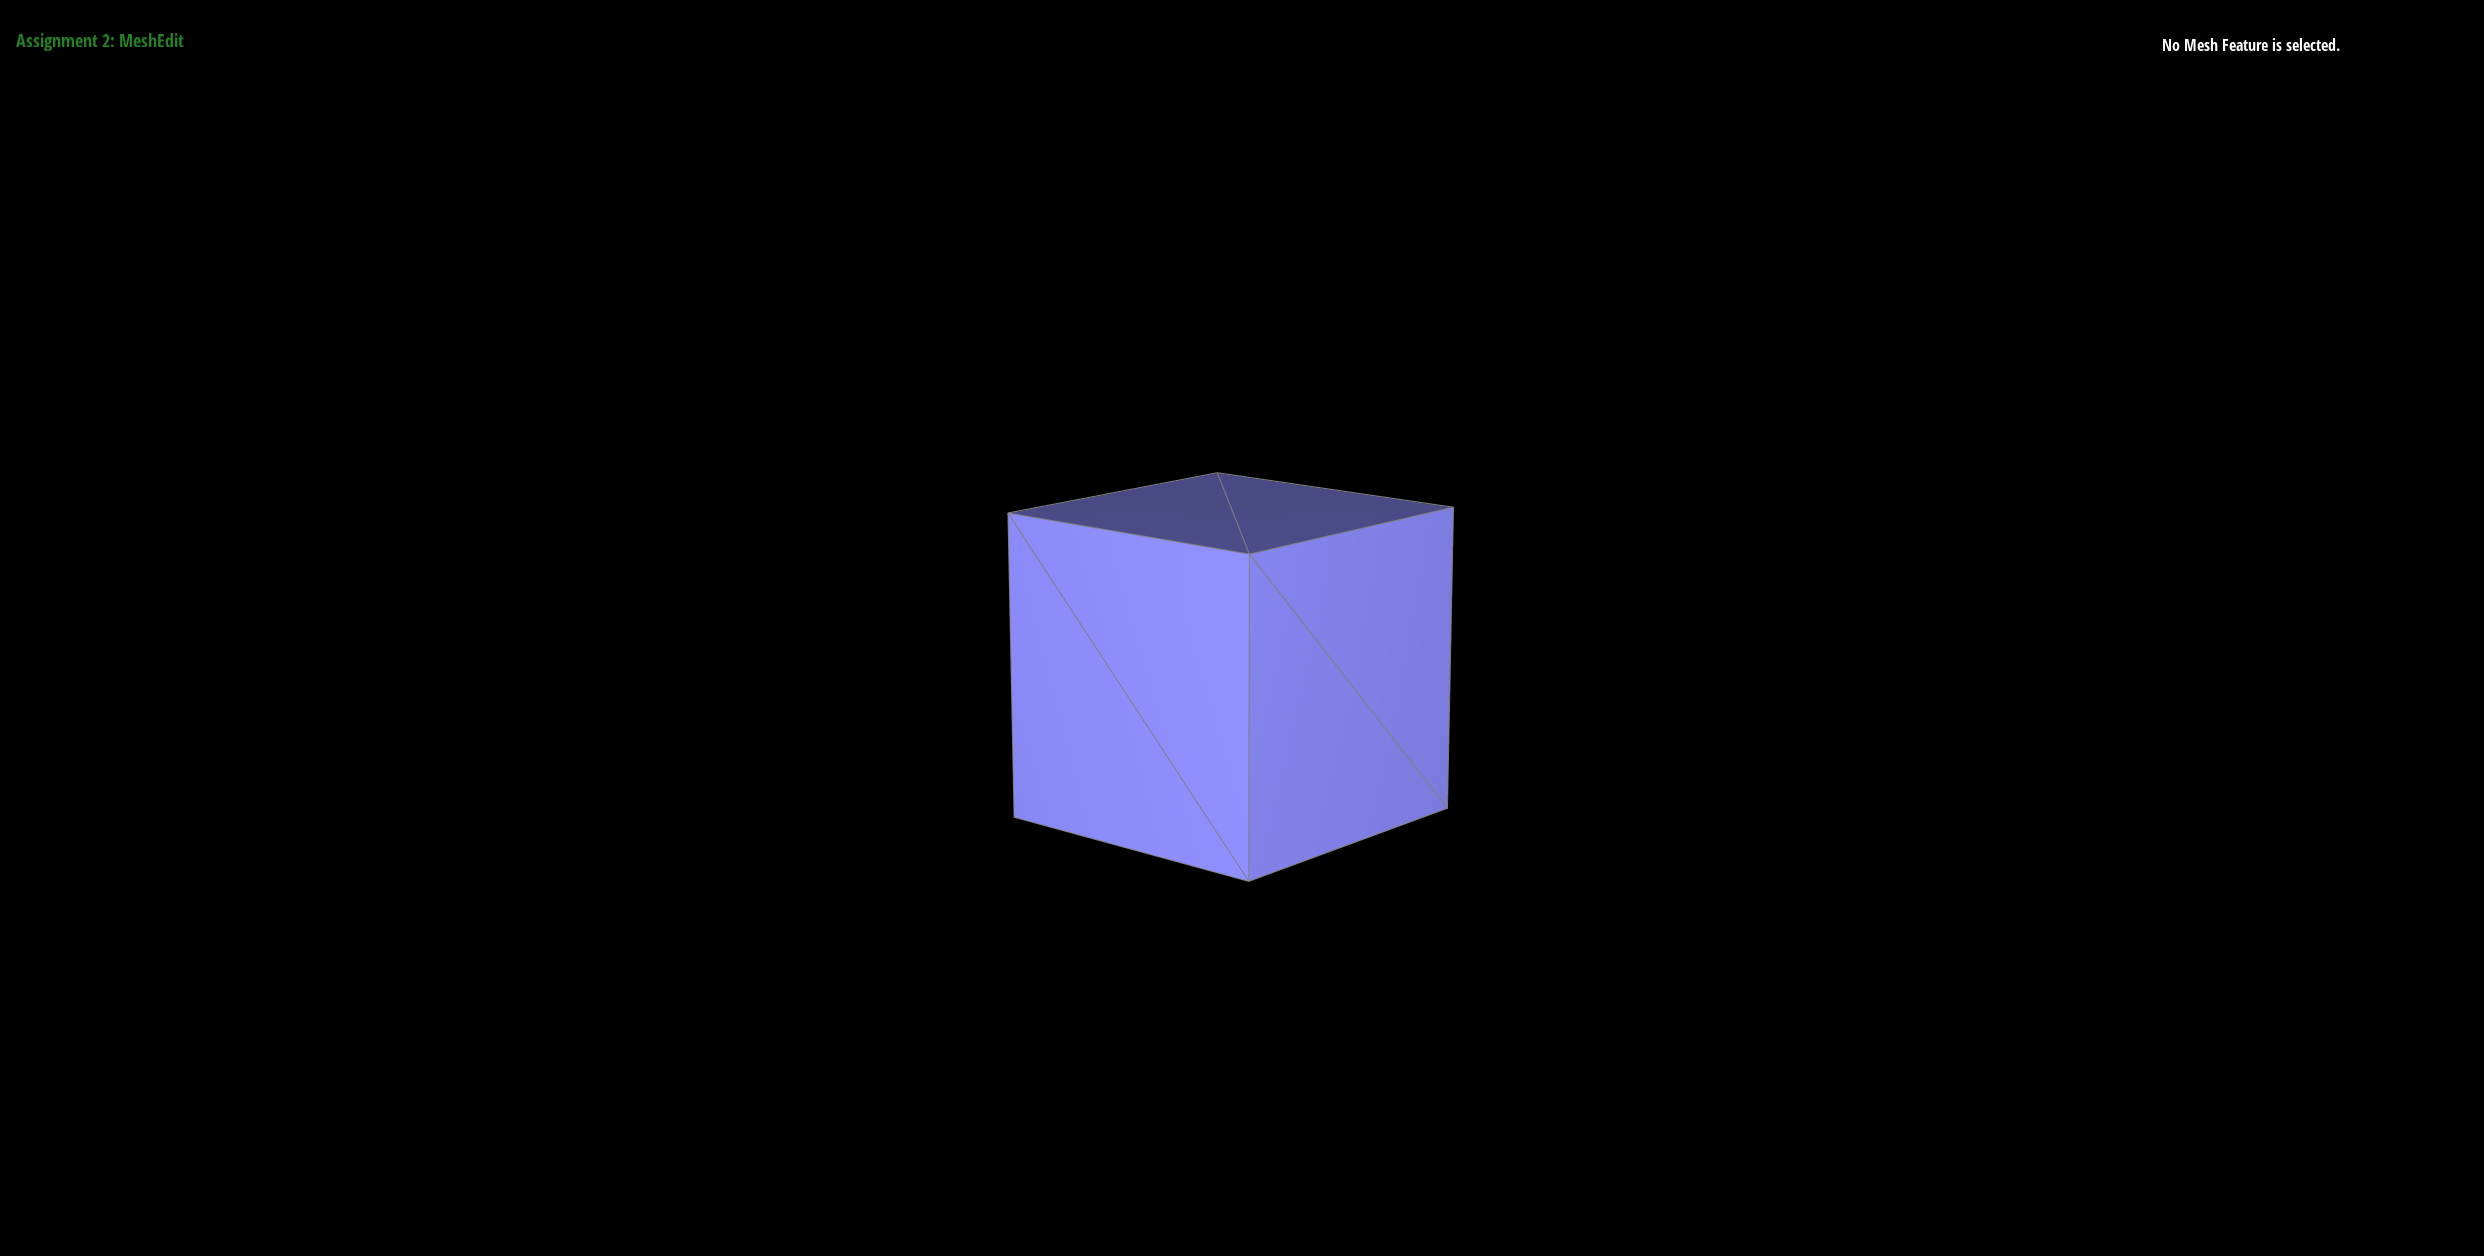
Although altering the mesh of the cube can lead to some small benefits, ultimately over time, with more subdivisions, the information given by the original few triangles will cause some distortion in subdivision.

